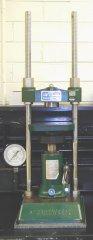
Carver Hydraulic Laboratory Press
Description
Hydraulic laboratory press for making KBr pellets for FTIR analysis of solid samples.
Manufacturer
Carver Laboratory Equipment, Wabash, Indiana
Model
C
Location
Bagley 83
Serial Number
25576-605
Asset Number
86551
Location
Bagley 83
Training Required
Yes
Operating Instructions for Evacuable 13 mm KBr Die
Preparation of the die for use:
- Place the base (C) on the bench top. Carefully check to see that the bottom O-Ring seal (E) is properly positioned in its groove and is not damaged in any way. Assemble body (B) on base (C).
- Carefully place one of the pellets (D), polished face up, in the bore of the body (B). Connect the evacuation tube (on the side of the body) to a vacuum pump capable of providing a pressure of less than 2 mm Hg.
Loading the die:
- A common mixture of about 1 to 2 mg of sample and 200 to 300 mg of halide powder is sufficient to produce a disc approximately 2 mm thick.
- Using a funnel, pour the powder mixture into the bore of the body (B). Tap the side of the die lightly to be sure the powder is evenly distributed. Completely even powder distribution is accomplished by inserting the plunger (A) into the bore and rotating it lightly a few times. Withdraw the plunger slowly.
- Insert the second pellet (D), polished face down, into the upper half of the bore and follow this with the plunger (A). Be sure that the top O-Ring seal (E) is in place around the plunger and properly seated in the chamfer.
Making the disc:
- Position the die assembly in the hydraulic press. Without applying pressure, evacuate the die for 2-5 minutes (depending on the dryness of the sample).
- With continued evacuation, apply an 8-ton ram pressure to the die for 2-3 minutes. (Do not exceed 9-ton ram pressure.)
- Release the ram pressure slowly and remove the vacuum. NOTE: Repeated pressing, using the technique described above, may be necessary to produce proper CsI discs.
Removing the disc:
- Remove the base (C) from the body (B) leaving the plunger (A) in position.
- Invert assembly on the plate of the hydraulic press and place the plastic ring (F) on the center of the body opposite the plunger end. Using the hydraulic press, apply pressure slowly until the plunger (A) moves the lower pellet and disc clear of the bore.
- Carefully transfer the disc to a holder for analysis.
Care and storage of die:
- After use, all component parts of the die should be cleaned thoroughly and stored in a desiccator.
- The parts may be flushed with water and then rinsed with acetone. Do not allow solvents to contact O-Rings.
Troubleshooting:
| FAULT | PROBABLE CAUSE | REMEDY |
|---|---|---|
| Disc is clear, but it scatters energy, particularly at short wavelengths. | Generally, the particle size is too large. | Grind sample more thoroughly. |
| Disc is clear, but there are isolated white spots. | Coarse grains in otherwise fine powder. | Grind sample more thoroughly. Sieving may be necessary. |
| Irregular and blotchy appearance. | Dampness in powder. | Dry powder more thoroughly. |
| The disc flakes or crumbles. | Powder ground too finely. | Grind powder for shorter period of time. |
| Disc opaque over part or most of area. | Insufficient compacting pressure and/or uneven distribution of powder. | Use higher pressure. Spread powder more thoroughly. |
| Disc cloudy. | Insufficient evacuation time or leaky seals. | Lengthen evacuation time and check all seals. |